사실... 누구에게 알려주기 위함보다는 내가 이해하기 위해하는거다;;;
간단히 Palib 예제중에 스타일러스를 따라서 선을 그리는 예제를 수정해서 Ndslib방식으로 적용해 비교해보겠다.
(Palib 설치후에 devkitPro\PAlibExamples\Bitmap8-16bit\8bitDraw 폴더에 있다)
예제에서 중요한부분만 줄여서 쓴다.
// Includes
#include <PA9.H>       // Include for PA_Lib


int main(void)
{
	PA_Init();    // Initializes PA_Lib
	PA_InitVBL(); // Initializes a standard VBL


	// Let's put some colors... in the background palettes
	PA_SetBgPalCol(1, 1, PA_RGB(31, 31, 31));
	PA_SetBgPalCol(0, 1, PA_RGB(31, 31, 31));


	// This will initialise an  bit background on each screen.
	// This must be loaded before any other background.
	// If you need to load this after a backgrounds,
	// you'll have to use PA_ResetBgSys, PA_Init8bit, then reload
	// your backgrounds...
	PA_Init8bitBg(1, 3);
	PA_Init8bitBg(0, 3);


	// Infinite loop to keep the program running
	while (1)
	{
		// Simple draw function, draws on the screen...
		PA_8bitDraw(1, // Screen
				1);  // Palette color

		// Draws a pixel on the top screen,
		// corresponding to the stylus's position
		PA_Put8bitPixel(0, Stylus.X, Stylus.Y, 1);
		// (Screen, X, Y, Pallette color)


		PA_WaitForVBL();
	}
	return 0;
}
PA_8bitDraw 와 PA_Put8bitPixel 의 차이점이라면 전자는 스타일러스 인식이된 좌표끼리 이어나가는 함수이고 후자는 단순히 인식된 곳만 찍어주는 방식이다. 후자는 스타일러스보다 사용자가 임의로 지정한곳에 뿌려줄때 쓰일듯하다.
Ndslib 예제는 비슷한게 없어서 http://www.double.co.nz/nintendo_ds/nds_develop2.html 예제를 기반으로 수정해보겠다.
// Includes
#include <NDS.H>	// Include for NDS_Lib

void draw_shape(int x, int y, uint16* buffer, uint16 color)
{
	buffer += y * SCREEN_WIDTH + x;
    uint16* line = buffer + (SCREEN_WIDTH);
    *line++ = color;
}


int main(void)
{
	irqInit();
	irqEnable(IRQ_VBLANK);
	// a vblank interrupt is needed to use swiWaitForVBlank()
	// since the dispatcher handles the flags no handler is required

	// put the main screen on the bottom lcd
	lcdMainOnBottom();

	touchPosition touch;


	videoSetMode(MODE_FB0);
	vramSetBankA(VRAM_A_LCD);


	while(1) {
		scanKeys();

		// read the touchscreen coordinates
		touch=touchReadXY();

		//draw_shape(10, 10, VRAM_A, RGB15(0, 0, 0));
		draw_shape(touch.px, touch.py, VRAM_A, RGB15(31, 31, 31));


		swiWaitForVBlank();
  }
  return 0;
}
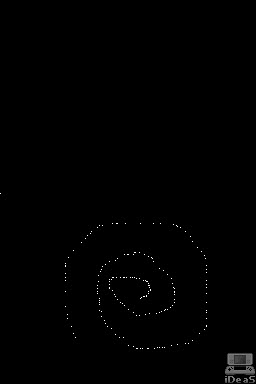
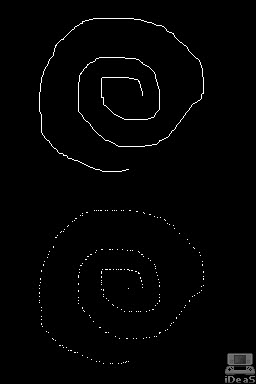
출력은 차이는 없다.
비슷한 위치에 비슷한 역활을 하는 코딩들이 있다.
Ndslib 예제는 정석은 아니다. 여기저기 예제보고 짜집기한것 뿐인데 수정하다보니까 Ndslib/Palib의 성격을 알거 같다.
Ndslib은 사용자가 메모리를 설정하고 평면의 2차원이 아니라 1차원의 배열로 정의한다. 그걸 2차원으로 보기위해 draw_shape 함수가 필요하다. Palib에선 PA_Put8bitPixel 함수가 그 역할을 하도록 미리 정해져 있다. Palib은 버퍼처리라고 하기도 좀 그런듯하다.
Palib은 스타일러스 인식도 기본적으로 포함되어있다. Ndslib은 선언해야한다.
Palib에선 메모리도 따로 설정하지않는다. 초기화만 있다.
결론은... Palib은 Ndslib을 좀더 유저편의를 위해 만든 라이브러리라는거다. 더 파고들어가면 차이는 더 커질듯하다.
각각 장단점은 있다. 편의성, 실용성 뭐 그런...
하지만 표현만 다를뿐 같은 행동을 하는 코드 들이니 자꾸 보다보면 각각의 코드를 컨버팅하는것도 어렵진 않겠지.
초보가 이정도 알아냈으면 됐다;;;
보다가 double buffer가 언급되던데 나중에 알아봐야겠다.
'NDS' 카테고리의 다른 글
| 약간의 진척... (5) | 2008.07.23 |
|---|---|
| 현재까지의 테스트 이미지 (0) | 2008.07.23 |
| Palib 한글 처리 진행상황... (0) | 2008.07.23 |
| Palib에서 한글처리... (2) | 2008.07.21 |
| Palib - Pause (0) | 2008.07.21 |
